Basket Tracking allows information about shopping baskets in e-commerce systems to be sent to Maxemail. This information can then be used for several purposes such as recipient profiling and triggering automated shopping cart abandonment emails.
How it works
The configuration of the abandonment email to be sent (if any) and the time delays are all configured within the Maxemail user interface. Only the details of activity on the website need to be implemented within your e-commerce platform.
Although these instructions provide a largely frontend implementation using our Javascript library, it is also possible to make the API requests directly as a server-side request (eg. access to basket items, user details, etc.).
The first step is to enable Basket Tracking within Maxemail, and get a copy of the configuration details, which includes the Customer ID, Basket Type ID, and Security Salt.
A full set of basket items should be provided to Maxemail each time they are updated in the basket. As the user moves through the stages of checkout, the current stage should be sent to Maxemail. It is the combination of these two that provide Maxemail with the details of the items, and an indicator of when the user stops moving through the website causing any basket abandonment email to be sent. As such, viewing a product page should also be considered a stage to be reported to Maxemail, so that a user who spends a long time actively viewing product pages does not get sent an abandonment email.
The stages you choose to implement should then be added to the configuration in Maxemail, so that the system can correctly show the progression of your users in the Basket Tracking reporting.
Including the script
The API can be included in any webpage by adding the following code to the head of an HTML document;
<script type="text/javascript" src="https://mxm.xtremepush.com/scripts/basket.js"></script>Setting the Defaults
Every time the script sends basket data to Maxemail, values for the following fields must be set:
- Customer ID
- Security Token
- Recipient
- Basket Type Id
- Stage
The stage field should be explicitly set with each request sent, however, to simplify request calls, it is possible to set defaults which are used for all successive requests. This is done using the setDefaults method, which can set any of these fields, with the exception of stage.
Example 1
function onLoad() {
    Mxm.Basket.setDefaults({
        customer_id: 123,
        token: 'bfdc8e544cb03157361af762b5f9616e',
        recipient: '[email protected]',
        basket_type_id: 1,
    });
}
Setting the Items
The principle method of the API is setItems which is used to set what items are currently in the basket.
Include all itemsThis method does not append items to the items list, so all items currently in the basket must be provided with each request.
Building on Example 1:
Example 2
function onLoad() {
    Mxm.Basket.setDefaults({
        customer_id: 123,
        token: 'bfdc8e544cb03157361af762b5f9616e',
        recipient: '[email protected]',
        basket_type_id: 1,
    });
}

var itemList = [];

function onItemAdd(itemName, itemQuantity, itemValue, itemDescription) {
    var item = {
        name: itemName,
        quantity: itemQuantity,
        value: itemValue,
        description: itemDescription
    };
    itemList.push(item);

    Mxm.Basket.setItems({
        stage: 'browsing',
        items: itemList
    });
}
When this method is called, a request is automatically sent to the system in the background. There are three methods in the API for which this occurs;
Setting the Stage
The stage can be set at any point using the setStage method. The following is an example of how the method can be used to show that the user is currently going through the checkout process.
NamingA stage name can only contain letters and underscores.
Example 3
function onLoad() {
    Mxm.Basket.setDefaults({
        customer_id: 123,
        token: 'bfdc8e544cb03157361af762b5f9616e',
        recipient: '[email protected]',
        basket_type_id: 1,
    });
}

function onCheckOut() {
    Mxm.Basket.setStage({
        stage: 'checking_out'
    });
}
Clearing the Items
The contents of a basket can be easily cleared using the clearItems method. This will have the same effect as calling setItems and giving an empty array. It is also possible to update the current stage with this method.
Example 4
// Defaults already set, as in Example 1
function onBasketEmpty() {
    Mxm.Basket.clearItems({
        stage: 'empty'
    });
}
Completing a Basket
When an order has been placed, the basket must then be set to the 'complete' stage using the setStage method;
Example 5
// Defaults already set, as in Example 1
function onOrderComplete() {
    Mxm.Basket.setStage('complete');
}
The 'complete' stage is a reserved stage built into the Basket Abandonment system. Setting a basket to this stage will ensure that the basket will not be abandoned and will not have the trigger email sent.
Creating the Token
Each request must be sent with a Token. This token is an MD5 hash of the customer ID, recipient email and the security salt, concatenated with hyphens.
Security warningThe security token MUST NOT be generated on the client side, eg. using JavaScript, as the
securitySaltand generation code would be public and visible to anyone visiting your site.The security token SHOULD be generated server-side, so the
securitySaltvalue is kept secret.
The following examples shows this being created and used in a PHP environment:
$customerId = 123;
$recipient = '[email protected]';
$securitySalt = '--provided salt--';
$token = md5("$customerId-$recipient-$securitySalt");
The token can then be inserted into the JavaScript on the webpage;
function onLoad() {
    Mxm.Basket.setDefaults({
        customer_id: <?php echo $customerId; ?>,
        token: <?php echo $token; ?>,
        recipient: <?php echo $recipient; ?>,
        basket_type_id: 1,
    });
}
Debug mode
In normal operation, the application will always close connections early with a 200 response, to reduce any wait time impact on end-user browsers, and not show errors to the end-user (i.e. the basket data is process asynchronously).
For development purposes, debug mode can be enabled either by adding debug: true to the values passed into setDefaults() , or by calling setDebug(true) . In debug mode, connections will not be closed until each API call is fully processed (i.e. basket data is processed synchronously), and errors will be returned to the browser. This must not be used in your production environment.
Testing
The most reliable way of testing the basket tracking and cart abandonment emails is to login to your website as a customer (so the script can pick up your email address), add products to the basket and close the page. If implemented correctly, after the set period of time, a triggered email containing the basket items should be sent to the email address of a person who abandoned the basket.
Alternatively, a near real-time testing can be done in Maxemail by creating a Standard email campaign. In the content of the email, the Cart snippet needs to be placed and a data list needs to be attached in the Data tab. The attached data list should have stored all email addresses that are used for website testing.
Finally, the rendered version will appear in the Preview tab and the content will be set based on the actions on your page.
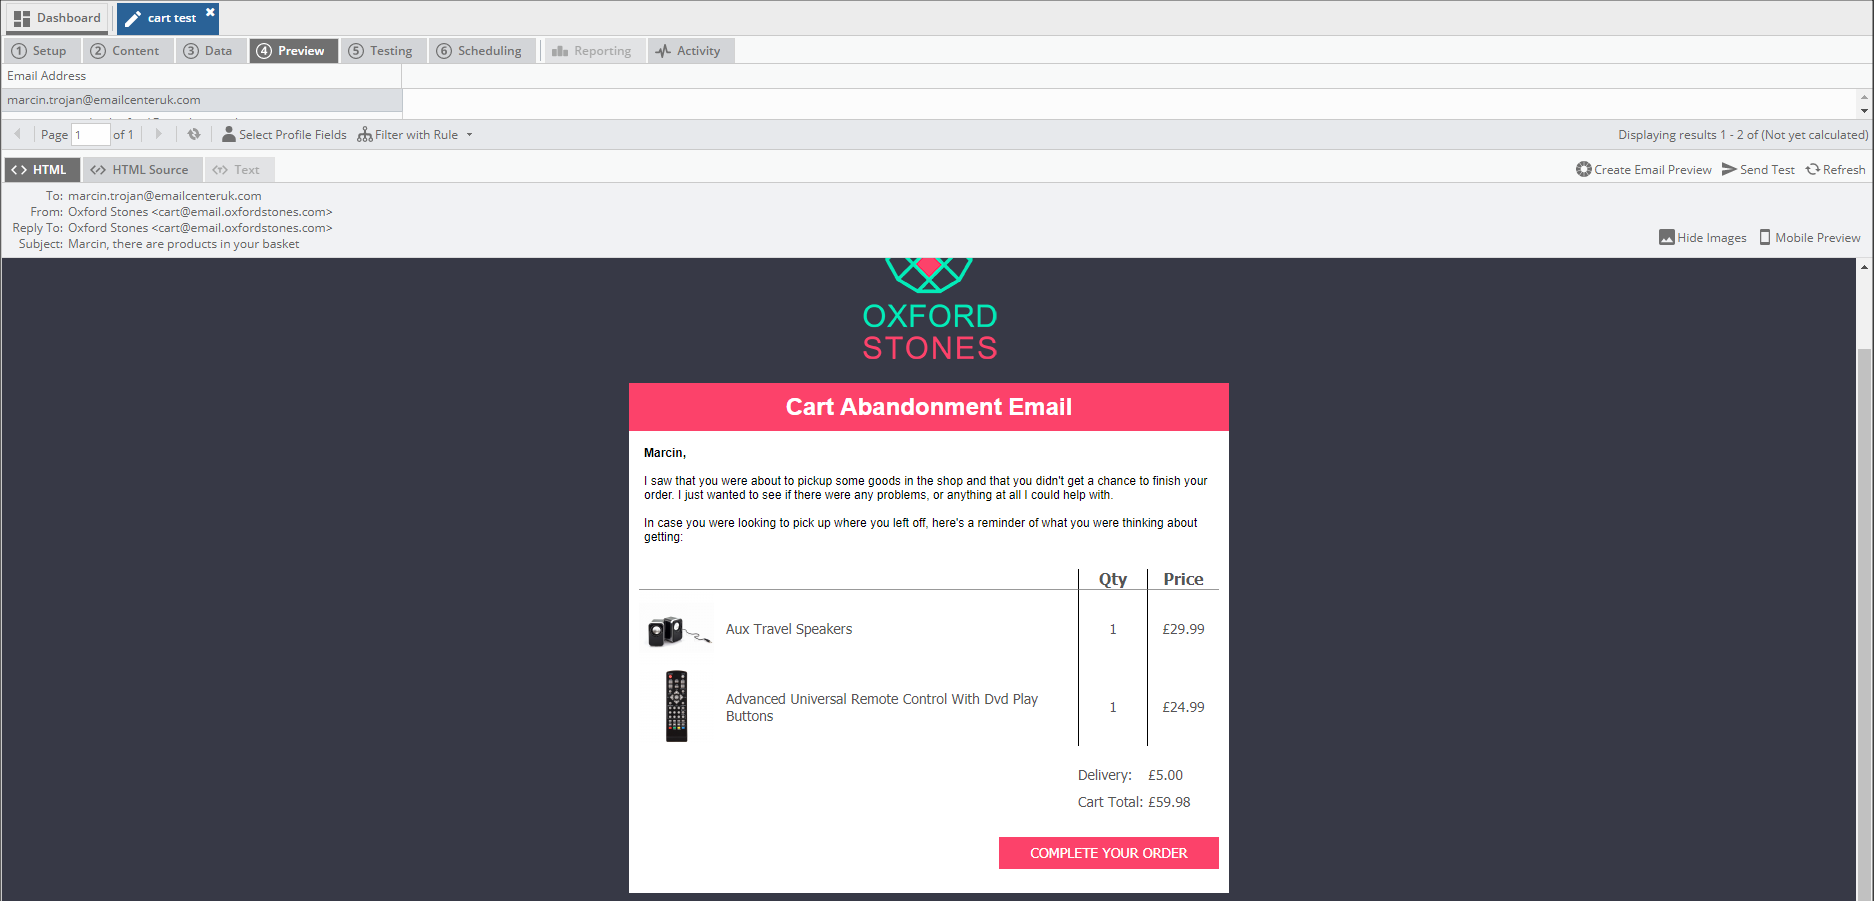
If the selected email address makes any cart related changes on the website, Maxemail upon the email refresh will update the content of the email